
If you've never worked with resin before, the terminology alone can feel overwhelming. Pot life, demold time, deep-pour versus UV cure — it's a lot to absorb before you've even mixed your first batch.
This guide breaks it down simply. You'll get the essential supplies, more than 15 cute project ideas grouped by category, pro tips for a glass-like finish, safety guidance, and a look at what it takes to turn your hobby into something bigger.
Key Takeaways
- A basic kit (resin, hardener, molds, and mixing tools) covers keychains and coasters.
- Quick-cure resins finish small accessories in hours; deep-pour suits thicker, advanced builds.
- Gloves, ventilation, and a respirator are essential — uncured resin irritates skin and lungs.
- Small, affordable pieces like jewelry and keychains sell well on handmade marketplaces.
Resin Crafting Essentials: Supplies, Resin Types & Safety Basics
Getting the right tools and resin type sorted before you start saves you from cloudy, tacky, or bubble-riddled results. Here's what matters.
Must-Have Resin Crafting Supplies
Every beginner setup needs the same core items:
- Two-part resin and hardener kit: the foundation of nearly every project
- Silicone molds: flexible and reusable for jewelry, coasters, and trays
- Mixing cups and stirring sticks: graduated cups help with accurate ratios
- Disposable gloves: nitrile works best against skin contact
- Heat gun or small torch: essential for popping air bubbles after pouring
For the "cute factor," stock up on mica powder, alcohol ink, fine glitter, dried flowers, and small charms or beads. These add-ins are what turn a plain resin blob into something giftable.
Choosing the Right Type of Resin for Your Project
Not all resin behaves the same way, and picking the wrong type is the fastest route to frustration.
| Resin Type | Cure Trigger | Best For |
|---|---|---|
| Standard two-part epoxy | Chemical reaction (resin + hardener) | Coasters, general crafts, coatings |
| UV resin | Ultraviolet light exposure | Earrings, pendants, keychains, small jewelry |
| Deep-pour epoxy | Chemical reaction, slower cure | Floral casting, thick decor, keepsakes |
UV resin cures in minutes under a lamp, but it's designed for small, light-accessible pieces: think studs and thin pendants, not thick trays. Within the standard epoxy category, high-gloss "tabletop" style resin is formulated for wide, shallow pours like serving trays and canvas art. Jewelry resin is thinner and self-levels better in tiny cavities.
Safety First: Working with Resin Responsibly
Uncured resin isn't something to handle casually. OSHA notes that respiratory exposure can increase when epoxy is sprayed or cured at high temperatures, and that sanding or machining cured resin can generate inhalable dust. Skin irritation from uncured resin is common enough that gloves should be a default, not an afterthought.
A few non-negotiables:
- Work in a well-ventilated space, ideally with a fan or open window
- Wear nitrile gloves every time you mix or pour
- Keep a respirator mask on hand if your workspace has limited airflow
- Designate a dedicated table or mat: resin drips are permanent
15+ Cute Resin Craft Ideas to Try This Weekend
These project ideas span skill levels and occasions, so there's something here whether it's your first pour or your fiftieth.
Adorable Resin Jewelry & Accessories
- Resin stud earrings with pressed flowers or fine glitter for a delicate, giftable finish
- Monogram keychains with colorful tassels (great party favors or backpack tags)
- Pendants or rings embedded with tiny charms, dried botanicals, or faux crystals
- Holographic hair clips that catch light with a shimmering, iridescent finish
Sweet Resin Home Decor Pieces
- Galaxy or geode-style coasters using a simple paint-pour swirl technique
- Serving trays finished with pressed flowers or mosaic tile under a glossy top coat
- Paperweights encasing small trinkets, coins, or preserved botanicals for a specimen-art look
- Miniature succulent magnets for a desk or fridge that never need watering
Fun Resin Gifts & Keepsakes
- Bookmarks with dried flowers — a quick, thoughtful gift for readers
- Photo or memory pendants that seal a small picture or handwritten note inside
- Custom phone grips in color-shift or iridescent finishes
- Animal-shaped ring dishes, like a unicorn with a tiny resin horn
Seasonal & Holiday Resin Crafts
- Wood-slice ornaments for Christmas gifting and tree decor
- Four-leaf clover coasters or keychains for St. Patrick's Day
- Pumpkin or autumn-leaf decor for fall tablescapes
- Conversation-heart pendants for Valentine's Day gifting
Pick one category, gather your add-ins, and start with something small. A single keychain mold is a low-stakes way to learn how your resin behaves before committing to a larger tray project.
Pro Tips for Flawless, Picture-Perfect Resin Crafts
A few habits separate a cloudy, bubbled piece from a glass-smooth one.
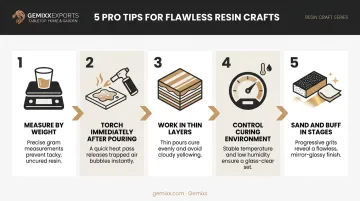
- Measure by weight, not volume. A kitchen scale gives you a far more accurate 1:1 or 2:1 ratio than eyeballing cups, and an off ratio is the number one cause of a tacky or cloudy cure.
- Torch immediately after pouring. A quick pass with a heat gun or small torch pops surface bubbles before they set — wait too long and they're locked in permanently.
- Work in thin layers when embedding objects. Pouring too thick at once can shift flowers, charms, or glitter out of place, or cause uneven discoloration.
- Control your curing environment. ArtResin recommends curing pieces at 75–85°F with humidity below 80%. A garage in winter or a humid bathroom will both cause problems.
- Sand and buff in stages. Move through progressively finer grits on fully cured pieces to get that professional, glass-like shine.
Cure times vary by product, so don't rely on memory alone. Fast-curing formulas can demold in a matter of hours, while standard two-part epoxy is dry to the touch around 24 hours but needs closer to 72 hours for a full cure. Rushing a piece off the mold too early is a common beginner mistake.
Turning Cute Resin Crafts into a Small Side Business
Once you've got a few solid pieces under your belt, it's natural to wonder if resin crafting could earn some extra income. Small, affordably priced items — jewelry, coasters, keychains — tend to do well because they're easy "microtransaction" purchases for buyers browsing handmade marketplaces.
Etsy's own Fall/Winter 2025 Seller Trend Report even flags "resin home decor in unexpected shapes" as a current trend shoppers are searching for.
A few things matter more than raw talent when it comes to selling:
- Consistent photography — buyers judge handmade goods by their photos first
- A cohesive brand identity — a recognizable color palette or packaging style helps you stand out
- Reliable production — one-off hobby pours don't scale well once orders pick up
That last point is where many crafters hit a wall. Producing five coasters by hand on a weekend is manageable. Producing five hundred with consistent color, finish, and quality is a different problem entirely.
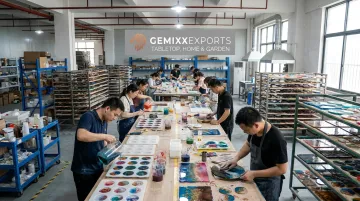
This is where manufacturers built for handmade goods come in. Gemixx Exports, for instance, works with home decor brands and growing maker-led labels ready to move a hand-poured resin concept — coasters, trays, catchalls, sculptural pieces — into a retail-ready collection at production volume.
Their process starts from a sketch, render, or existing sample, moves through a prototype approval stage, and typically runs 60–90 days from approved sample to finished production. Every piece is still hand-poured and hand-finished, so the natural marbling and veining that makes resin pieces feel one-of-a-kind stays intact, even at volume.
If you're weighing whether to scale beyond your own workbench, start that conversation before order volume overwhelms you, not after.
Frequently Asked Questions
What resin crafts sell the most?
Small, affordable items like resin jewelry, coasters, and keychains tend to sell well because their low price point encourages repeat, low-commitment purchases. Personalization options, such as initials or custom colors, also help drive sales.
What cannot be put in resin?
Fresh (non-dried) flowers and leaves should be avoided, since their moisture reacts with resin and causes browning or cloudiness. Stick to dried botanicals, paper, or plastic items that are fully dry before embedding.
How long does it take for resin to cure?
Quick-cure formulas can demold in as little as 4–8 hours, while two-part epoxy is dry to the touch in about 24 hours and fully cured within 72 hours. Timing varies by brand, so check your product's instructions.
Is resin crafting safe to do at home?
Yes, with proper precautions — a well-ventilated space, nitrile gloves, and a respirator mask if airflow is limited. Avoid skin contact with uncured resin and never sand cured pieces without a dust mask.
What's the difference between UV resin and epoxy resin?
UV resin cures in minutes under ultraviolet light and requires no mixing, making it ideal for small pieces like earrings. Epoxy resin needs precise mixing of resin and hardener and takes much longer to cure, but it suits larger or thicker projects.
Do I need a UV lamp to start making resin jewelry?
No. Standard two-part epoxy resin cures on its own over time without any special equipment. A UV lamp is only necessary if you're working specifically with UV-reactive resin for faster curing.